Taught by Prof. Carlo Sequin in SLIDE
Course homepage:http://www.cs.berkeley.edu/~sequin/CS184
FINAL PROJECT - SIERPINSKI KITE AT THE BERKELEY MARINA
Assignments 1, 2, 3, 4, 5, 6, 7, 8, 9
Assignments 1 and 2: basic data structures and interpolation in 2D

Assignment 3 and 4: transformations, culling, and clipping in 2D
Assignments 5 and 6: transformations, culling, and clipping in 3D; stereo viewing
Assignment 7: scan conversion and z-buffering
Assignment 8: lighting calculations and gouraud shading
Assignment 9: procedural rendering
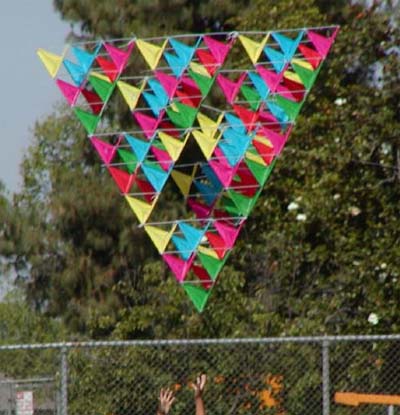
This is the first assignment that has been focused on developing a scene, rather than developing the rendering code. The kite below will be one of the kites used in our final project. First, here are a few images of the making and inspiration of the Sierpinski kite. Though I can adjust the iteration level, the kite looks best at level 3, so I took all my snapshots there.
|
|
The image that we rendered is a Sierpinski kite, inspired by a real Sierpinski kite we saw on the internet. Each triangle of the kite has four faces, two facing outward and two identical ones facing inward, that share an edge. The opposite corners of the kite are connected by a string, to give the appearance of "holding the kite together" to make the model look more realistic. The default iteration of the Sierpinski kite is 3, and can be varied between 1 and 6 (which takes a relatively long time to render and thus is not recommended). The surfaces are added in the iteration code, so the level 1 iteration has no color.
The tail of the kite is a sweep through a Bezier curve, and uses dynamic tcl code to vary its control points to produce the illusion of waving in the breeze. The tcl code consists of alternating negative and positive sine and cosine functions, with the appropriate amplitude and period. The end of the tail traces an arc rather than a straight line, to stop the tail's appearance of "stretching".

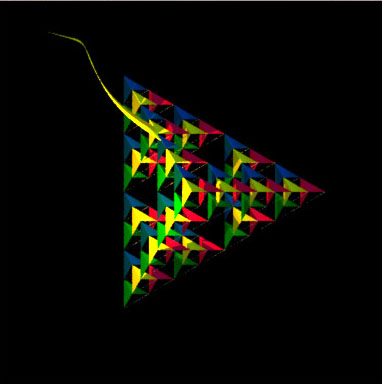
Four differences between the two images above:
1- Kite struts are nearly invisible in the BMRT rendering. This is probably due to the fact that they're very thin, so the rays often miss them entirely. Slide, in contrast, renders objects directly rather than rendering what is hit by "photons" in the scene, and the strings are put through the pipeline like everything else. Also, the strings may be in too much shadow to show up much in the BMRT rendering, or they may be faded into the background due to antialiasing.
2- In BMRT, he kite's triangles have the shadows of other triangles and of the tail cast on them, giving them a mottled and much more realistic look. SLIDE doesn't calculate shadows between objects because it would require a sorted list of polygons, or something else that doesn't work with the pipeline rendering model. In contrast, BMRT uses the radiosity model rather than the pipeline model, and can compute multiple layers of shadows, resulting in the mottled effect on the triangles.
3- The BMRT image looks both smoother and fuzzier than the SLIDE image. This could be due to the ray tracing, which more directly computes the lighting at every point and is more accurate than Gouraud shading, which is only an approximation. This could also be due again to the different modeling techniques of SLIDE and BMRT: while SLIDE faithfully renders every shape, BMRT only renders the points in the scene hit by a "ray".
4- The BMRT image, when examined closely, shows some blending of colors along the edges of the triangles, which the SLIDE image does not have. For example, the border between a red triangle and a blue triangle is a mottled purple color. This is due to the antialiasing in BMRT, which SLIDE does not support.

When the scene is rendered with a low number of samples for the area light, the area light is more like a collection of point lights, each casting a different shadow on the background. This results in a scene with many discrete shadows cast on the background surface. In addition, a flat background illuminated by an area light with few samples will look "spotty", due to the falloff in luminosity of point light sources. More samples results in a background with more uniform luminosity, and there's a gradual shift from the light of the background to the darkest part of the shadow, without discrete steps.

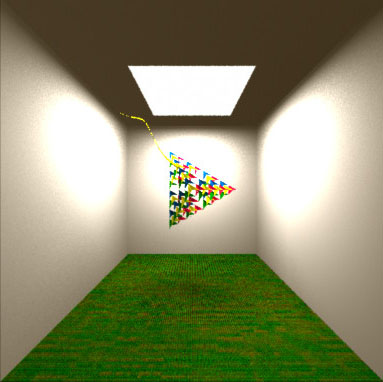
Radiosity made the scene much brighter in the second image above because of the re-emitted light in the scene, especially from the walls around the area light. The ceiling went from black to dark brown, the floor from dark brownish-green to a bright green. Qualitatively, the walls look as bright as the area light source in the ceiling, because they're emitting light as well. Around the edges of the bright spots on the wall, a small amount of color - reflected from the kite and from the floor - is apparent. The whole wall is a soft brown rather than harsh gray, from light reflected from the floor.