Bare Conductive | Touch Board | Workshop Pack
This set has everything you’ll need to get inspired, organize, and run short or all day workshops with a group of up to 20 participants.
For additional resources, download the Resource Guide manual from the Bare Conductive page. This guide includes links to the company’s popular resources regarding techniques, tutorials, and downloadable files to help with your project and/or lesson.
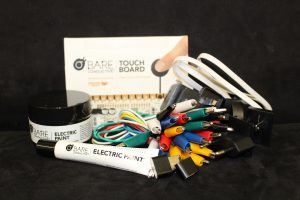
This set includes:
- 5 Touch Boards
- 5 Electric Paint 50 mL Jars
- 5 x Electric Pain 10 mL Tubes
- 5 x MicroSD cards
- 5 x SD card readers
- 5 x Micro USB cables
- 5 x Universal USB plugs
- 60 x Alligator clips
Quick start instructions can be found inside the Touch Board box and on the Bare Conductive website:
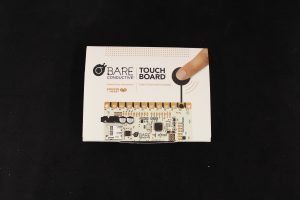
Once you unbox the device, remove the Touch Board to reveal a quick start guide on the inside cover of the packaging. The bottom flap gives you symbols of where to locate basic functions, such as the on/off switch, the audio jack, etc.
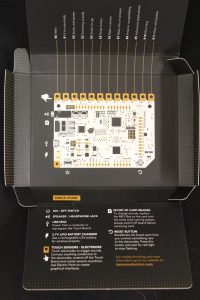
Once you have identified the different locations, get a set of earphones and speakers and attach it to your touch board. Remember, the touch board will not operate without a power source. Power the touch board with the USB attachment. The audio guide will give you more details about how to operate the touch board.
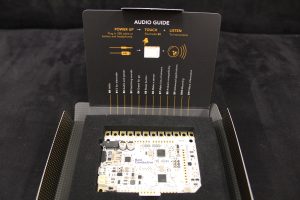
The following is a quick summary of the audio instructions of each electrode:
- E0: Greetings
- E1: The touch board has 12 electrodes in total (E0-E11). These electrodes sense touch and activate.
- E2: A USB cable or battery will power the touch board and must be paired with headphones and a speaker.
- E3: To change sounds, replace the MP3 files on the card with the same track naming system. Remeber to always turn off the board before removing the card.
- E4: There are three LED lights.
- Green = ON
- Red = Activated electrode
- Orange = Charging
- E5: The reset button is your friend. Every time you press this button, you have to recalibrate your board.
- E6: Extend from the touch board to create sensors anywhere. Connect to E0, calibrate, then touch the wire and see what happens!
- E7: Don’t stop with E0. Try adding more sensors.
- E8: Other programs, such as Arduino, are compatible with this device.
- E9: You can write your own code for this robot.
- E10: You can attach different sensors using the holes near the E0 and E11 electrodes.
- E11: More instructions on this electrode.
Please note that you will be able to swap out audio within the electrodes, but we ask that you save the original audios as a separate file on the microSD cards before removing the audio. The microSD is already inside the touch board when you unbox it. We also ask that once you are done with your lesson, to replace the audio back to its original instructions for the next user.
Helpful tutorials and links by Bare Conductive – just click on the title to proceed to the website:
- Cold solder with electric paint
- Things to keep in mind for the electric paint
- How to use printed sensors
- How to screen print with electric paint
- Diluting the electric paint
- How to seal the electric paint
- Changing the volume on a Touch Board
- How to connect to your Touch Board’s capacitive sensors
- Setting up your Touch Board with Arduino Installer
- How to use a shielded cable