Of course you already have xterm installed given that you installed X. But, the default is not particularly appealing (in my opinion at least). So we'll set up a nicer configuration.
vi ~/.Xdefaults
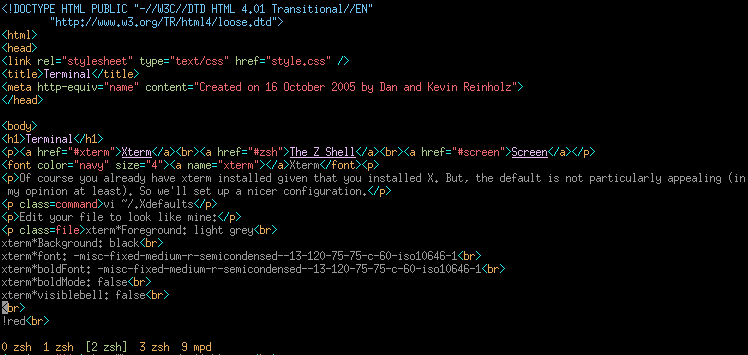
Edit your file to look like mine:
xterm*Foreground: light grey
xterm*Background: black
xterm*font: -misc-fixed-medium-r-semicondensed--13-120-75-75-c-60-iso10646-1
xterm*boldFont: -misc-fixed-medium-r-semicondensed--13-120-75-75-c-60-iso10646-1
xterm*boldMode: false
xterm*visiblebell: false
!red
xterm*color1: #EA6868
xterm*color9: #FF7272
!green
xterm*color2: #ABCB8D
xterm*color10: #AFD78A
!yellow
xterm*color3: #E8AE5B
xterm*color11: #FFA75D
!blue
xterm*color4: #71C5F4
xterm*color12: #67CDE9
!magenta
xterm*color5: #E2BAF1
xterm*color13: #ECAEE9
!cyan
xterm*color6: #21F1EA
xterm*color14: #36FFFC
!white
xterm*color7: #F1F1F1
xterm*color15: #FFFFFF
Zsh is a very powerful shell, which is much nicer than the default Bourne Shell FreeBSD comes with. We will gain access to tab completion (a must) and many other nice features, many of which i haven't even begun to scratch the surface of myself. su to root:
cd /usr/ports/shells/zsh
make install clean
exit
Now it's time to set zsh as your default shell.
chsh -s /usr/local/bin/zsh
You will have to logout and then login in order for the shell change to take effect. You can also do the same as root if you like. Now we'll setup a few things to make zsh a bit nicer.
vi ~/.zshrc
This is one of a few config files for zsh. Add the following lines:
alias l='ls -G'
alias la='ls -aG'
alias ll='ls -lhG'
alias ls='ls -G'
alias vi='vim'
LSCOLORS="exgxxxxxbxxxxxxxxxxxxx"; export LSCOLORS
autoload -U compinit
compinit
The few aliases will make our ls (or l) show up in color, and allow la to list all files, and ll to ls in a list. If you use vim it is nice to alias it to vi (out of habit). Next I setup the color scheme. The next two enable many of zsh's advanced features. Close your current terminal and bring up a new one. Try an ls, cool eh? If you're not familiar with tab completion, type part of a file in a directory, then hit tab. Or try typing up to a directory, and then tab. Try tabbing again. The cycling ability of zsh's tab completion is quite handy.
ScreenGNU Screen is a very handy utility. It is a terminal multiplexer. You can have many "virtual terminals" running at once in the same window. Screen gives a very handy and simple way to switch betwen them. Before continuing I highly recommend you go through custom keyboard and map caps lock to another control key. It is not necessary, but screen does make extensive usage of the control key, so having it in a better place would be worth your while. Without further ado let us install screen.
cd /usr/ports/misc/screen && make install clean
At this point we could begin using screen, but it would be better to set a few options first.
vi ~/.screenrc
Insert the following lines:
startup_message off
defscrollback 1024
termcapinfo xterm ti@:te@
hardstatus alwayslastline "%{yk}%-w%{gk}[%n %t]%{yk}%+w"
vbell off
Now if you want to start screen just type screen in your terminal. You should see a nice familar zsh prompt, but you should also see a line on the bottom, that says "0 zsh". That is the line that we added in the config file. Eventually you may have many such labels on the bottom, with different numbers. Now I'll give a guide on the basic operation of screen. Hit 'Ctrl+a' in order to enter command mode. Then type the next key as a command.
[ - copy text: first highlight with space, then move to end, hit space again
] - paste copied text
n - next screen
p - previous screen
# - that # screen
c - new screen
d - detach screen
When you hit 'ctrl+a' that is your cue for screen to listen up. The next key you hit will be the command you give to screen. So hit 'Control' and 'a' together, and then hit the next key afterwards. Use 'p', 'n', and '0'-'9' to switch between the screens you have open. 'c' will create a new screen, which is useful when you would normally have a few terminals up. The scrollback buffer is incredibly useful. 'Ctrl'+'a' and then '[' will bring you into that mode. It makes it possible to stop and read something during a compile, and you can copy text between your open screens. This is great for copy/paste between multiple instances of vim. When it scrollback mode hit 'space' once in order to start selecting text. Then scroll over with the arrow keys or the vi keys (hjkl) to the end of the desired copy. Hit 'space' to copy. Now if you type 'ctrl+a' then ']' you can paste the copied text, into any of your screens. Finally when you use 'ctrl+a' then 'd' you can detach screen. This will allow you to resume a session later by typing screen -r in your terminal. This is very useful if you accidently close xterm, as your programs will still be running. You can also do some pretty neat things in conjunction with ssh.
We can set up fluxbox in order to start screen inside our xterm when it starts up. I find this useful, as it almost ensures I'll never open up another xterm. In .fluxbox/startup.sh where you would normally have xterm & you can replace it with xterm -e screen &. We can also set up an alias to make screen much more convenient to use.
vi ~/.zshrc
Add the following line:
alias s='screen'
This will allow us to quickly start new screens. For instance, instead of su'ing in the current screen, you can simply type s su and a new screen will open up prompting you for your root password. Very slick. You can use vim in a similar way. In fact I used to use gvim, but now I feel there is little reason to. Finally, a screenshot of your xterm after completing this section: