Believe it or not, it is actually very simple to configure FreeBSD to use foreign languages. Look at fonts for adding the requisite fonts to your system (for ideal viewing pleasure). That will allow you to view fonts in whatever foreign language you desire, but it is even more useful to be able to input text in whatever language you desire. In order to to do so we will utilize uim - an input manager. The path you choose will depend on your needs. For the majority of languages, we can use m17n-lib. You can check if your language is supported here. In my case I used hi-itrans (Devanagari). If you want to use Japanese, then you will take the second route. Afterwards the two paths converge to configure uim. Finally, Kevin has some additional notes for using Japanese in FreeBSD.
Devanagari
Japanese
UIM
Additional Notes on Japanese
In order to use Devanagari, we will utilize m17n-lib.
cd /usr/ports/devel/m17n-lib
make install clean
Now we can move along to the second port.
cd /usr/ports/textproc/uim-m17nlib
make install clean
Before moving along it is important to note that you can view all of the keymappings at /usr/local/share/m17n/ (this will allow you to figure out the proper key combinations to enter the characters of your choice. Now we can continue on to install and configure uim.
The first thing we need is a Kana to Kanji conversion engine:
cd /usr/ports/japanese/anthy
make install clean
"Anthy is a Japanese input method working on X11 and emacs. It converts Hiragana text to Kana Kanji mixed text." (Quoted from /usr/ports/japanese/anthy/pkg-descr). There are actually dozens of conversion engines available, but my wife and I prefer Anthy, which was recommended by my friend Akihiro.
cd /usr/ports/japanese/uim-anthy
make install clean
This port will allow us to use anthy in conjunction with uim. Now we can continue on to install and configure uim.
Now that we have made the required installations for our language of choice, we need to install uim.
cd /usr/ports/textproc/uim
make install clean
When that's done. . .
cd /usr/ports/textproc/uim-gtk
make install clean
And when that's finished. . .
cd /usr/ports/textproc/uim-qt
make install clean
Now that we have the software needed to input foreign text in FreeBSD, we need to tell the system to use it. I'll assume you only want/need to be able to input foreign text in X11 (the graphic interface in FreeBSD), so that's what I'll teach you how to do.
Open your user's .xinitrc file. (You had to be "su" to install from Ports, but now you'll want to exit, returning to your user).
vi ~/.xinitrc
We have to add a few lines to tell X to enable uim at startup (make sure you add all of these lines before startfluxbox - once X reaches that command it will stop executing further commands, meaning it should alwaysbe the last line of your .xinitrc).
export LANG=en_US.UTF-8 LC_ALL=en_US.UTF-8
export GTK_IM_MODULE=uim
export QT_IM_MODULE=uim
export XMODIFIERS="@im=uim"
The first "export" line is entirely optional, but I recommend it. Instead of using the default "C" (i.e. ASCII) locale, I'm telling X that to use US English as my default language, but to use UTF-8 (unicode), which is far less restrictive in terms of displayable characters. The advantage of this is that while my menus, etc. will appear in English, Japanese text will be properly displayed as long as I'm using a font that supports it. The following lines enable their respective uim modules.
The next line you add will depend on what input engine you are using. For Devanagari:
uim-xim --engine=m17n-hi-itrans &
For Japanese:
uim-xim --engine=anthy &
At this point we can configure uim (do this as user):
uim-pref-gtk &
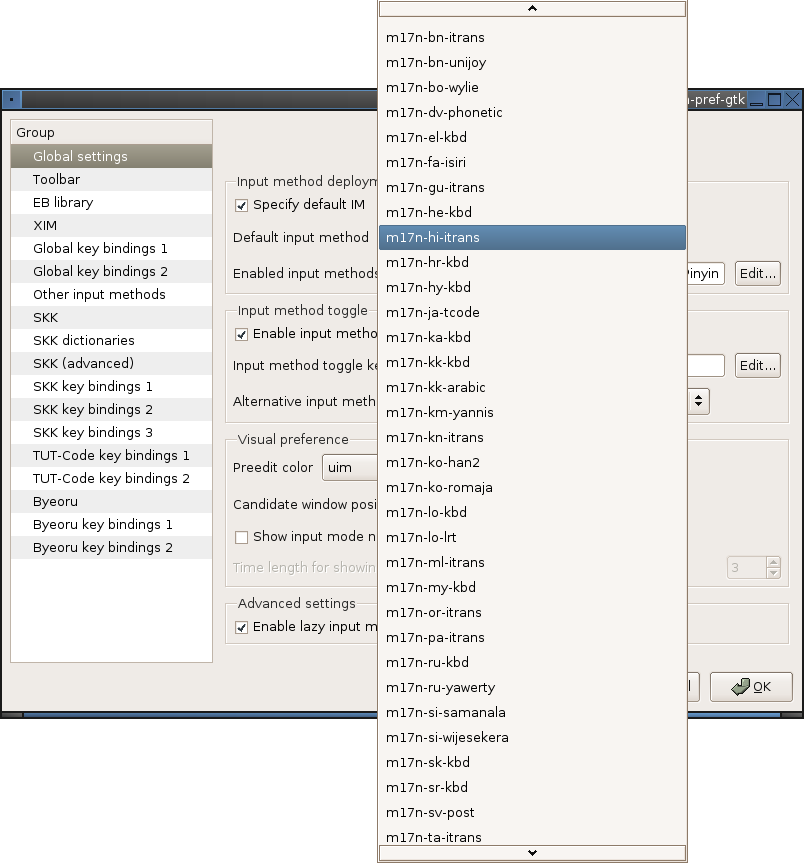
This will bring up a graphical configuration utility for uim. It should look something like this:
Under the "Global Settings" group (this should be the default screen that appears when you launch uim-pref-gtk), check the box near the top that says "Specify default IM" and then click on the menu labeled "Default input method." This will bring up a very long list of choices. The choice for Devanagari is highlighted in the screenshot. For Japanese find "Anthy" and select it.
The default key combination for changing between languages is shift+space. However, this is very easy to bump on accident, so it is not extremely desirable. Instead, we can change this mapping to to Ctrl+space, which is much more convenient, and nearly impossible to bump on accident.
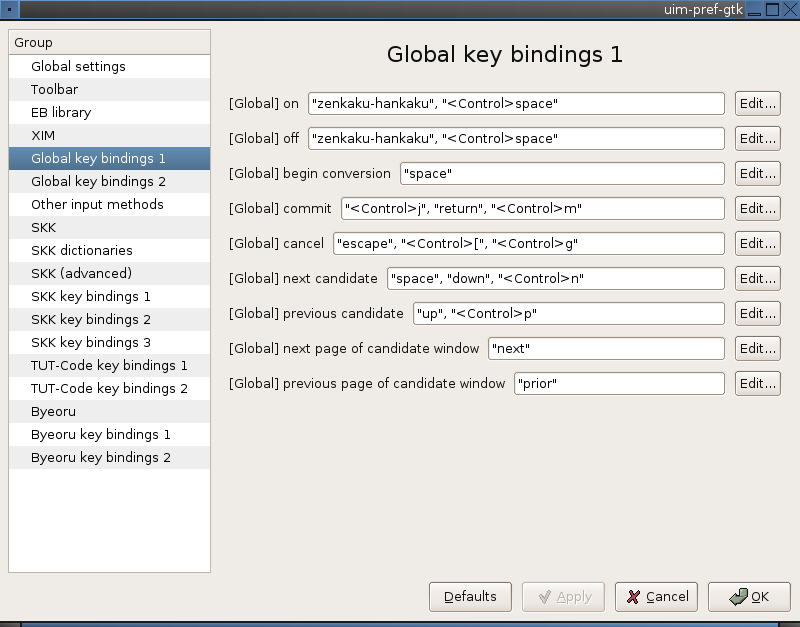
Click on the "Edit" box for both "[Global] on" and "[Global] off" in order to edit this setting. In addition to adding Ctrl+space, be sure to remove Shift+space, so you don't hit it on accident.
Once you've finished with this, click "Apply" and then "OK" at the bottom of the configuration window. That's it. Exit fluxbox and "startx" again, and you should have foreign input enabled.
As a final note, you might want Japanese web page titles, filenames, etc. to display properly in your Fluxbox menus. In order to accomplish this, we have to specify a Japanese font in our Fluxbox style. As root,
vi /usr/X11R6/share/fluxbox/styles/Nyz
Where "Nyz" is your Fluxbox style of choice. (You can check what style you're using by looking at "fluxbox menu" > "System Styles" that comes up when you right-click on the desktop.
In the file that comes up, change the font each time it appears. For example, I changed
toolbar.font: lucidasans-10
To the following:
toolbar.font: mspgothic
In all, a font is specified 5 times in this file. Be sure to change each of these to your Japanese font of choice. Changes will take effect when you restart Fluxbox.
If you want programs supporting localization to launch with Japanese menus, etc., you can add a line (or replace my first "export" line with the following) to your ".xinitrc" file telling X to use Japanese localization:
export LANG=ja_JP.UTF-8 LANGUAGE=ja_JP.UTF-8 LC_MESSAGES=ja_JP.UTF-8
(You could also specify "ja_JP.eucJP" or "ja_JP.SJIS" in place of "ja_JP.UTF-8" depending on your personal preference).
Various apps look to different variables for their localization. The line "LANG=ja_JP.eucJP" is sufficient to make "Abiword" come up with Japanese menus. Other apps might require setting the other variables to Japanese as well. Not all apps support localization.
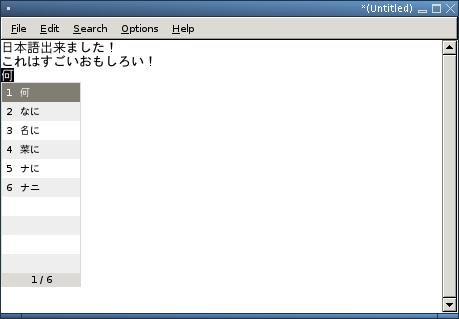 Leafpad with Japanese input | 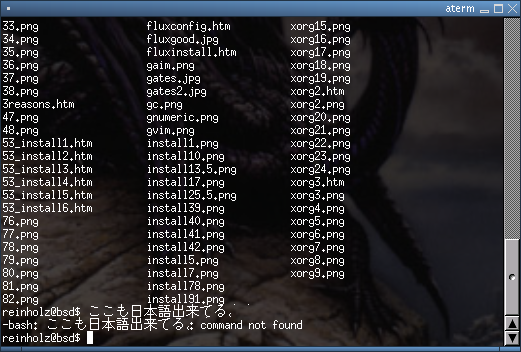 Aterm with Japanese input |
If you want a terminal that allows Japanese input, you can find one in "/usr/ports/japanese/kterm". Install it like any other Port and you'll be able to use Japanese in kterm terminal (I can't think of much use for this, however, as I only use English terminal commands. Perhaps it would be useful for browsing files with Japanese filenames).
Finally, here are a few notes on using Japanese in Mozilla Thunderbird:
If you want to send e-mails in Japanese, you want to be able to make sure the recipient can view them properly. Go to the "Edit" menu, then select "Preferences", and within that window choose the "Fonts" tab. Under "Character Encoding", there are drop-down menus for "incoming mail" and "outgoing mail". Select "ISO-2022-JP" for both, like this:
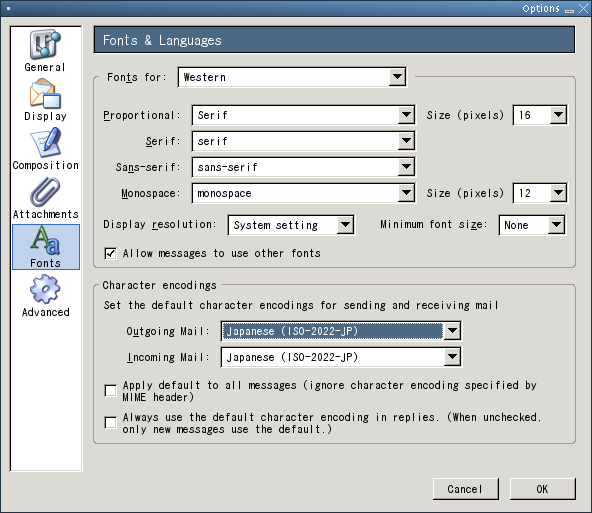
E-mails sent with ISO-2022-JP as their character encoding will display properly for Ezweb, Vodafone, and Docomo users in Japan. They should also display properly on most personal computers.
For some recipients, however, you might have to send Japanese messages in another character encoding. The most likely scenario is that you're sending to a Windows user with an old version (say Windows 98) of Windows OS. By default, Windows uses SHIFT_JIS as its chracter encoding. We don't have that as an option for "outgoing mail".
If you want to use SHIFT_JIS or EUC-JP as your default character encoding for "outgoing mail", you have to add it to your list of choices. To do this, "Write" a new message, then select the "Options" menu, select "Character Encoding", and "Customize". A window will pop up with 2 columns, one displaying "Available Character Encodings" and one displaying "Active Character Encodings". Select the encodings you want (SHIFT_JIS and EUC-JP) from the left column and click on the "Add" button to add them to your list of "Active Character Encodings".
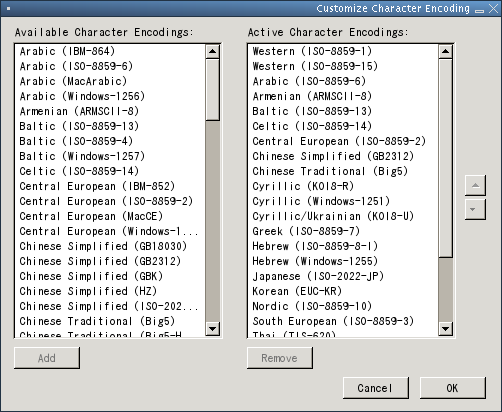
There, now you should have those character encodings available to you, either when you compose a new message and want to use another encoding, or if you want to change the default encoding for all "outgoing mail".