Research
This document is out-of-date, no longer authoritative, and only here for historical purposes. Please consult riscv.org for the most recent installation instructions.
The Linux/RISC-V Installation Manual
January 2, 2014
Introduction
The purpose of this page is to document a procedure through which an interested user can install an executable image of the RISC-V architectural port of the Linux kernel.
A project with a duration such as this requires adequate documentation to support future development and maintenance. This document is created with the hope of being useful; however, its accuracy is not guaranteed.
Table of Contents
Copyright Information
This document is currently under development. This document is copyrighted by Quan Nguyen, © 2014. All rights reserved. I do intend, however, to release this document to the public freely upon its satisfactory completion.
Meta-installation Notes
Running Shell Commands
Instructive text will appear as this paragraph does. Any instruction to execute in your terminal will look like this:
$ echo "execute this"
Optional shell commands that may be required for your particular system will be backed by a blue background, and marked "Optional":
Optional $ echo "call this, maybe"
When booted into the Linux/RISC-V kernel, and some command is to be run, it will appear as a root prompt against a black background:
# echo "run this in linux"
If you will need to replace a bit of code that applies specifically to your situation, it will be surrounded by [square brackets].
The Standard Build Unit
To instruct how long it will take someone to build the various components of the packages on this page, I have provided build times in terms of the Standard Build Unit (SBU), as coined by Gerard Beekmans in his immensely useful Linux From Scratch website.
On an Intel Xeon Dual Quad-core server with 48 GiB RAM, I
achieved the following build time for binutils: 38.64 seconds.
Thus, 38.64 seconds = 1 SBU. (EECS members at the University
of California, Berkeley: I used the s141.millennium server.)
As a point of reference, my 2007 MacBook with an Intel Core 2
Duo and 1 GiB RAM has 100.1 seconds to each SBU. Building
riscv-linux-gcc, unsurprisingly, took about an hour.
Items marked as "optional" are not measured.
Having Superuser Permissions
You will need root privileges to install
the tools to directories like /usr/bin, but you may optionally
specify a different installation directory. Otherwise, superuser privileges are
not necessary.
Installing the Toolchain (11.81 + ε SBU)
Let's start with the directory in which we will install our
tools. Find a nice, big expanse of hard drive space, and let's call that
$TOP. Change to the directory you want to install in, and then set
the $TOP environment variable accordingly:
$ export TOP=$(pwd)
For the sake of example, my $TOP directory is on
s141.millennium, at /scratch/quannguyen/noob, named so
because I believe even a newbie at the command prompt should be able to boot
Linux using this tutorial. Here's to you, n00bs!
Installing the RISC-V simulator (0.40 SBU)
If we are starting from a relatively fresh install of GNU/Linux, it will be necessary to install the RISC-V toolchain. The toolchain consists of the following components:
riscv-gcc, a RISC-V cross-compilerriscv-fesvr, a "front-end" server that services calls between the host and target processors on the Host-Target InterFace (HTIF) (it also provides a virtualized console and disk device)riscv-isa-sim, the ISA simulator and "golden standard" of executionriscv-opcodes, the enumeration of all RISC-V opcodes executable by the simulatorriscv-pk, a proxy kernel that services system calls generated by code built and linked with the RISC-V Newlib port (this does not apply to Linux, as it handles the system calls)riscv-tests, a set of assembly tests and benchmarks
In actuality, of this list, we will need to build only
riscv-fesvr and riscv-isa-sim. These are the two
components needed to simulate RISC-V binaries on the host machine. We will also need to
build riscv-linux-gcc, but this involves a little modification of
the build procedure for riscv-gcc.
First, clone the tools from the ucb-bar GitHub
repository:
$ git clone git@github.com:ucb-bar/riscv-tools.git
This command will bring in only references to the
repositories that we will need. We rely on Git's submodule system to take care
of resolving the references. Enter the newly-created riscv-tools directory and
instruct Git to update its submodules. If you want to use ssh-add
to prevent yourself from typing in your private key password many times, do so
now by running
Optional
$ exec ssh-agent /bin/bash
$ ssh-add ~/.ssh/id_rsa
Then, cd into the directory and then initialize and update the submodules.
$ cd $TOP/riscv-tools
$ git submodule update --init
To build GCC, we will need several other packages, including flex, bison, autotools, libmpc, libmpfr, and libgmp. Ubuntu distribution installations will require this command to be run. If you have not installed these things yet, then run this:
Optional $ sudo apt-get install autoconf automake autotools-dev libmpc-dev libmpfr-dev libgmp-dev gawk build-essential bison flex texinfo gperf
Before we start installation, we need to set the
$RISCV environment variable. The variable is used throughout the
build script process to identify where to install the new tools. (This value is
used as the argument to the --prefix configuration switch.)
$ export RISCV=$TOP/riscv
If your $PATH variable does not contain the
directory specified by $RISCV, add it to the $PATH
environment variable now:
$ export PATH=$PATH:$RISCV/bin
One more thing: If your machine doesn't have the capacity to
handle 16 make jobs (or conversely, it can handle more), edit
build.common to change the number specified by
JOBS.
Optional $ sed -i 's/JOBS=16/JOBS=[number]/' build.common
Since we only need to build a few tools, we will use a
modified build script, listed in its entirety below. Remember that we'll build
riscv-linux-gcc shortly afterwards. If you want to build the full
toolchain for later use, see here.
1
2
3
4
#!/bin/bash
. build.common
build_project riscv-fesvr --prefix=$RISCV
build_project riscv-isa-sim --prefix=$RISCV --with-fesvr=$RISCV
Download this script using this command:
$ curl http://www.ocf.berkeley.edu/~qmn/linux/linux-build.sh > basic-build.sh
Make the script executable, and with everything else taken care of, run the build script.
$ chmod +x basic-build.sh
$ ./basic-build.sh
Building riscv-linux-gcc (11.41 SBU)
riscv-linux-gcc is the name of the
cross-compiler used to build binaries linked to the GNU C Library
(glibc) instead of the Newlib library. You can build Linux with
riscv-gcc, but you will need riscv-linux-gcc to
cross-compile applications, so we will build that instead.
The SYSROOT Concept
When installing these toolchains, the make
system often generates a wide variety of libraries and other files. In
particular, building Glibc involves building the run-time dynamic linker and the
C standard library (ld.so.1 and libc.so.6, in this
case). These, together with header files like stdio.h, comprise the
system root, an often-necessary set of files for a fully operational
system.
When we built riscv-tools, there was no need
for specifying where to install these files, because we assumed we would always
be running on the host machine through a simulator; all of the libraries are on
the host system. Now that we're running our binaries from within an
operating system, we will have to provide these libraries and headers if we want
to run dynamically-linked binaries and compile programs natively.
We now must instruct the riscv-linux-gcc build
process to place our system root files in a place we can get to them. We call
this directory SYSROOT. Let's set our $SYSROOT
environment variable for easy access throughout the build process. Ensure that
this directory is not inside our $RISCV variable.
$ cd $TOP
$ mkdir sysroot
$ export SYSROOT=$TOP/sysroot
The Linux Headers
In an apparent case of circular dependence (but not
really), we have to give the riscv-linux-gcc the location
of the Linux headers. The Linux headers provide the details that Glibc needs to
function properly (a prominent example is include/asm/bitsperlong.h,
which sets Glibc to be 64-bit or 32-bit). There's a copy of the headers in the
riscv-gcc repository, so make a usr/ directory in
$SYSROOT and copy the contents of
riscv-gcc/linux-headers into the newly created directory.
$ mkdir $SYSROOT/usr
$ cp -r $TOP/riscv-tools/riscv-gcc/linux-headers/* $SYSROOT/usr
(In the event that the kernel headers
(anything inside arch/riscv/include/asm/ or in
include/) are changed, you can use the Linux kernel Makefile to
generate a new set of Linux headers - see here.)
Enter the riscv-gcc directory within the
riscv-tools repository, and patch up Makefile.in with
this patch:
sysroot-Makefile.in.patch. This patch adjusts the build system to accept the
--with-sysroot configuration flag for the relevant make targets.
(Credit to a_ou for the file from which I made this patch.) Use this line to patch it up:
$ cd $TOP/riscv-tools/riscv-gcc
$ curl http://www.ocf.berkeley.edu/~qmn/linux/sysroot-Makefile.in.patch | patch -p1
When that's done, run the configure script to generate the Makefile.
$ ./configure
These instructions will place your
riscv-linux-gcc tools in the same installation directory as the
riscv-gcc tool installed earlier. This arrangement is the simplest,
but if you would like to place them in a different directory, see here.
Run this command to start the build process:
$ make linux INSTALL_DIR=$RISCV SYSROOT=$SYSROOT
Take note that we supply both the variables
INSTALL_DIR and SYSROOT. Even though we are diverting
some files to the $SYSROOT directory, we still have to place the
cross-compiler somewhere. That's where INSTALL_DIR comes into
play.
When we originally built riscv-gcc, we built it
using the "newlib" makefile target (in
riscv-tools/riscv-gcc/Makefile). This "linux" target builds
riscv-linux-gcc with glibc (and the Linux kernel headers). Because
we now have to build glibc, it will take much more time. If you don't have the
power of a 16 core machine with you, maybe it's time to get a cup of coffee.
Building the Linux Kernel (0.40 + ε SBU)
Obtaining and Patching the Kernel Sources
We are finally poised to bring in the Linux kernel sources.
Change out of the riscv-tools/riscv-gcc directory and clone the
riscv-linux Git repository into this directory:
linux-3.4.xx, where xx represents the current
minor revision (which, as mid-July 2013, is "53").
$ cd $TOP
$ git clone git@github.com:ucb-bar/riscv-linux.git linux-3.4.53
Download the current minor revision of the 3.4 Linux kernel series
from The Linux Kernel Archives, and in one fell
swoop, untar them over our repository. (The -k switch ensures that
our .gitignore and README files don't get clobbered.)
$ curl ftp://ftp.kernel.org/pub/linux/kernel/v3.x/linux-3.4.53.tar.xz | tar -xJk
Because of the strange ABI complications that MIPS created (and RISC-V indirectly inherited), we have to patch the kernel sources to repair the Linux module symbol post-processing utility. The problem is documented in the Linux-MIPS archives.
$ cd linux-3.4.53
$ patch -p1 < modpost.patch
Configuring the Linux Kernel
The Linux kernel is seemingly infinitely configurable. However, with the current development status, there aren't that many devices or options to tweak. However, start with a default configuration that should work out-of-the-box with the ISA simulator.
$ make ARCH=riscv defconfig
If you want to edit the configuration, you can use a text-based GUI (ncurses) to edit the configuration:
Optional $ make ARCH=riscv menuconfig
Among other things, we have enabled by default procfs, ext2, and the HTIF virtualized devices (a block driver and console). In development, it can be very useful to enable "early printk", which will print messages to the console if the kernel crashes very early. You can access this option at "Early printk" in the "Kernel hacking" submenu.
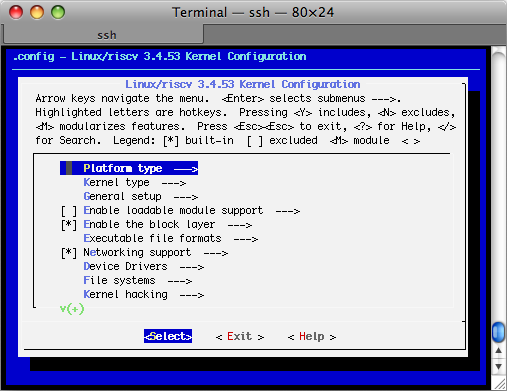
Linux kernel menuconfig interface.
Begin building the kernel once you're satisfied with your
configuration. Note the pattern: to build the RISC-V kernel, you must
specify the ARCH=riscv in each invocation of make.
This line is no exception. If you want to speed up the process, you can pass the
-j [number] option to make.
$ make -j ARCH=riscv
Congratulations! You've just cross-compiled the Linux kernel for RISC-V! However, there are a few more things to take care of before we boot it.
Building BusyBox (0.26 SBU)
We currently develop with BusyBox, an unbelievably useful set of utilities that all compile into one multi-use binary. We use BusyBox without source code modifications. You can obtain the source at http://www.busybox.net. In our case, we will use BusyBox 1.21.1, but other versions should work fine.
Currently, we need it for its init and
ash applets, but with bash cross-compiled for RISC-V,
there is no longer a need for ash.
First, obtain and untar the source:
$ cd $TOP
$ curl http://busybox.net/downloads/busybox-1.21.1.tar.bz2 | tar -xj
Then, enter the directory and turn off every configuration option:
$ cd busybox-1.21.1
$ make allnoconfig
We will need to change the cross-compiler, set the build to
"static" (if desired, you can make it dynamic, but you'll have to copy some
libraries later). We will also enable the init, ash,
and mount applets. Also, disable job control for ash
when the drop down menu for ash's suboptions appear.
Here are the configurations you will have to change:
CONFIG_STATIC=y, listed as "Build BusyBox as a static binary (no shared libs)" in BusyBox Settings → Build OptionsCONFIG_CROSS_COMPILER_PREFIX=riscv-linux-, listed as "Cross Compiler prefix" in BusyBox Settings → Build OptionsCONFIG_FEATURE_INSTALLER=y, listed as "Support --install [-s] to install applet links at runtime" in BusyBox Settings → General ConfigurationCONFIG_INIT=y, listed as "init" in Init utilitiesCONFIG_ASH=y, listed as "ash" in ShellsCONFIG_ASH_JOB_CONTROL=n, listed as "Ash → Job control" in ShellsCONFIG_MOUNT=y, listed as "mount" in Linux System Utilities
My configuration file used to create this example is located
here: busybox-riscv.config. You
can also download it directly using this snippet of code:
$ curl http://www.ocf.berkeley.edu/~qmn/linux/busybox-riscv.config > .config
Whether or not you want to use the file provided, enter the configuration interface much in the same way as that of the Linux kernel:
Optional $ make menuconfig
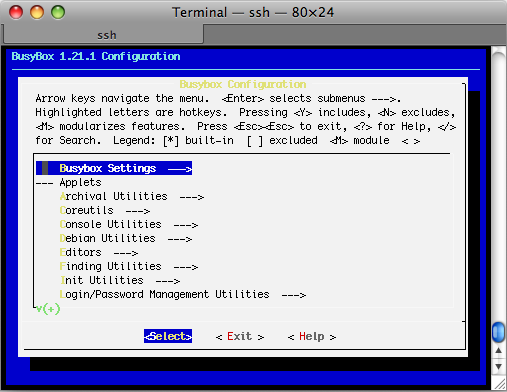
BusyBox menuconfig interface. Looks familiar, eh?
Once you've finished, make BusyBox. You don't need to specify
$ARCH, because we've passed the name of the cross-compiler prefix.
$ make -j
Once that completes, you now have a BusyBox binary cross-compiled to run on RISC-V. Now we'll need a way for the kernel to access the binary, and we'll use a root disk image for that. Before we proceed, change back into the directory with the Linux sources.
$ cd $TOP/linux-3.4.53
Creating a Root Disk Image
When we initially developed the kernel, we used an initramfs
to store our binaries (BusyBox in
particular). However, with our HTIF-enabled block device, we can boot off of a
root file system proper. (In fact, we still make use of the initramfs, but only
to set up devices and the symlink to init. See
arch/riscv/initramfs.txt.)
Currently, we have a root file system pre-packaged specifically for the RISC-V release. You can obtain it by heading to the index of my website, http://ocf.berkeley.edu/~qmn, finding my email, and contacting me. (Update on June 20, 2017: I no longer maintain an up-to-date root filesystem. Fortunately, it is much easier to boot Linux these days, for example by getting a distribution at riscv-yocto.)
To create your own root image, we need to create an ext2 disk
image. To create an empty disk image, use dd, setting the argument
to count to the size, in MiB, of your disk image. 64 MiB seems to
be good enough for our purposes.
$ dd if=/dev/zero of=root.bin bs=1M count=64
The file root.bin is just an empty chunk of
zeros and has no partitioning information. To format it as an ext2 disk, run
mkfs.ext2 on it:
$ mkfs.ext2 -F root.bin
You can modify this filesystem if you mount it as writable
from within Linux/RISC-V. However, a better option, especially if you want to
copy big binaries, is to mount it on your host machine. You will normally
need superuser privileges to do a mount. Do so this way, assuming you want
to mount the disk image at linux-3.4.53/mnt:
$ mkdir mnt
$ sudo mount -o loop root.bin mnt
(Instructions for mounting provided courtesy of a_ou.)
If you cannot mount as root, you can use Filesystem in Userspace (FUSE) instead. See here.
Once you've mounted the disk image, you can edit the files inside. There are a few directories that you should have:
/bin/dev/etc/lib/proc/sbin/tmp/usr/bin/lib/sbin
So create them:
$ cd mnt
$ mkdir -p bin etc dev lib proc sbin tmp usr usr/bin usr/lib usr/sbin
Then, place the BusyBox executable we just compiled in
/bin.
$ cp $TOP/busybox-1.21.1/busybox bin
If you have built BusyBox statically, that will be all
that's needed. If you want to build BusyBox dynamically, you will need to follow
a slightly different procedure, described here.
We will also need to prepare an initialization table in the
aptly-named file 1
::sysinit:/bin/busybox mount -t proc proc /proc Line 1 mounts the procfs filesystem onto Download a copy of the example
$ curl http://www.ocf.berkeley.edu/~qmn/linux/linux-inittab > etc/inittab If you would like to use
··· Once you've booted Linux and created the symlinks with line
4, they will persist between boots of the Linux kernel. This will cause a bunch
of unsightly errors in every subsequent boot of the kernel. At the next boot,
comment out line 4. Also, we will need to create a symbolic link to
$ ln -s ../bin/busybox sbin/init Add your final touches and binaries to your root disk image,
and then unmount the disk image.
$ cd .. Now, we're ready to boot a most basic kernel, with a shell.
Invoke $ spike +disk=root.bin vmlinux If there are no problems, an To exit the simulator, hit
If you want to reuse your disk image in a subsequent boot of
the kernel, remember to remove (or comment out) the line that creates the
symbolic links to BusyBox applets. Otherwise, it will generate several
(harmless) warnings in each subsequent boot. I know, I've been there too. Good luck! Depending on your system, you may have to execute a few more
shell commands or execute them differently. It's not too useful if you've
arrived here after reading the main text of the document; it's best that you're
referred here instead. If you want to build Optional
$ ./build.sh If you (or someone you know) has changed the Linux headers,
you'll need to install a new version to your system root before you build
First, go to the Linux directory and perform a headers
check: Optional
$ cd $TOP/linux-3.4.53 Once the headers have been checked, install them. Optional
$ make ARCH=riscv headers_install INSTALL_HDR_PATH=$SYSROOT/usr (Substitute the path specified by It may be desirable to install Optional
$ export RISCV_LINUX_GCC=[/path/to/different/directory] First, set the environment variable
If you are unable (or unwilling) to use First, create a folder as your mount point. Optional$ mkdir mnt Then, mount the disk image with FUSE. The Optional
$ fuseext2 -o rw+ root.bin mnt Modify the disk image as described, but remember to unmount
the disk using FUSE, not Optional
$ fusermount -u mnt If you want to conserve space on your root disk, or you want
to support dynamically-linked binaries, you will want to build BusyBox as a
dynamically-linked executable. You'll need to have these libraries: If BusyBox calls for additional libraries (e.g.
These were built when we compiled
Optional
$ cp $SYSROOT/lib/libc.so.6 lib/ That's it for the libraries. Go back to the BusyBox
configuration and set BusyBox to be built as a dynamically-linked binary by
unchecking the To make things a little faster, I've used a bit of
Optional
$ cd $TOP/busybox-1.21.1 Then, rebuild and reinstall BusyBox into Optional
$ make -j GCC is a complicated beast, to say the least. As of this
writing, the configuration to build a version of RISC-V GCC that runs on
Linux/RISC-V is still located on the "native" branch of the
First, we'll need to make a bigger disk image. A size of 256
MiB seems to be plenty enough. Then, fill it with all of the goodies from the
example root image. $ cd $TOP/linux-3.4.53 If you want a better text editor than piping
$ cp $TOP/busybox-1.21.1/busybox bin/ Now, let's build the native compiler. Change into the
$ cd $TOP/riscv-tools/riscv-gcc We'll need to apply a bothersome and hackish patch to GCC so
that $ patch -p1 < native-patches/native-host-linux.patch In case if you're wondering, Now, we are ready to build the native compiler. Run the
configure script to generate a fresh Makefile, and then invoke
$ ./configure Note that we've only supplied During the build process, your
machine will automatically fetch the sources for GMP, MPC, and MPFR (the GNU
Multi Precision Arithmetic Library, the GNU Multi Precision C Library, and the
GNU Multiple Precision Floating-Point Reliably Library). It will patch the
sources as previously described, and then it will automatically build them, too.
(They'll be removed at the end of the native build once it's complete because
they will interfere with building the "newlib" or "linux" Makefile targets.) Once the build is complete, your binaries will be located in
$ cd $TOP/linux-3.4.53/mnt-gcc I could tell you what the importance of these libraries are, but
you can learn it yourself: try excluding any of the libraries and see if your
program works at all. Change out of the directory, unmount the root disk image, and
then boot the kernel. $ cd .. In a short moment, the Linux kernel will boot. If you haven't
done anything special to your shell or your user configuration, you'll soon be
at a root prompt: # Use # echo -e '#include <stdio.h>\n int main(void) { printf("Hello world!\\n"); return 0; }' > /tmp/hello.c Invoke # gcc -o /tmp/hello /tmp/hello.c Wait for a dreadfully long time, and then run your hello
world program on Linux/RISC-V. # /tmp/hello Congratulations! You've got a native
A. Waterman, Y. Lee, D. Patterson, and K.
Asanović, "The RISC-V Instruction Set Manual," vol. II,
http://inst.eecs.berkeley.edu/~cs152/sp12/handouts/riscv-supervisor.pdf,
2012. D. P. Bovet and M. Cesati, Understanding the Linux
Kernel, 3rd ed., O'Reilly, 2006. M. Gorman, Understanding the Linux Virtual Memory Manager,
http://www.csn.ul.ie/~mel/docs/vm/guide/pdf/understand.pdf, 2003. J. Corbet, A. Rubini, and G. Kroah-Hartman. Linux Device
Drivers, 3rd ed., O'Reilly, 2005. G. Beekmans. Linux From Scratch, version 7.3, http://www.linuxfromscratch.org/lfs/view/stable/,
2013.inittab, placed in /etc. Here is the
inittab from our disk image:
2
3
4
5
::sysinit:/bin/busybox mount -t tmpfs tmpfs /tmp
::sysinit:/bin/busybox mount -o remount,rw /dev/htifbd0 /
::sysinit:/bin/busybox --install -s
/dev/ttyHTIF0::sysinit:-/bin/ash
/proc.
Line 2 does similarly for tmpfs. Line 3 mounts the HTIF-virtualized block
device (htifbd) onto root. Line 4 installs the various BusyBox
applet symbolic links in /bin and elsewhere to make it more
convenient to run them. Finally, line 5 opens up an ash shell on
the HTIF-virtualized TTY (ttyHTIF) for a connection.inittab using
this command:getty instead, change
line 5 to invoke that:
5
::respawn:/bin/busybox getty 38400 ttyHTIF0
/bin/busybox for init to work.
$ sudo umount mntspike, the RISC-V architectural simulator, named after the
golden spike that joined the two
tracks of the Transcontinental Railroad, and considered to be the golden model of
execution. We will need to load in the root disk image through the
+disk argument to spike as well. The command looks
like this:vmlinux is the name of the compiled Linux kernel
binary.ash prompt will
appear after the boot process completes. It will be pretty useless without the
usual plethora of command-line utilities, but you can add them as BusyBox
applets. Have fun!Ctrl-C.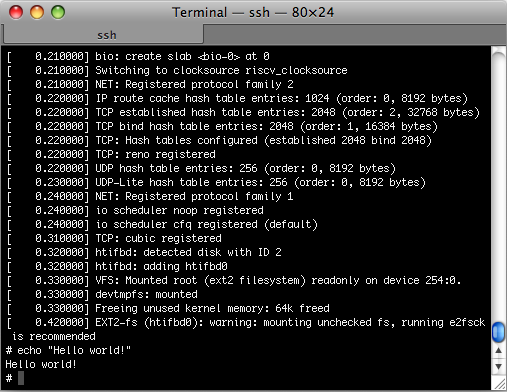
Linux boot and "Hello world!"
"Help! It doesn't work!"
Optional Commands
Building the Full Toolchain (7.62 SBU)
riscv-gcc (as
distinct from riscv-linux-gcc), riscv-pk, and
riscv-tests, then simply run the full build script rather than the
abbreviated one I provided.Installing a Fresh Copy of the Linux Headers
riscv-linux-gcc to make sure the kernel and the C library agree on
their interfaces. (Note that you'll need to pull in the Linux kernel sources
before you perform these steps. If you haven't, do so now.)
$ make ARCH=riscv headers_checkINSTALL_HDR_PATH if so desired.)Installing
riscv-linux-gcc to a Different Directory than riscv-gccriscv-linux-gcc
to a different directory. If that is the case, then run these commands instead
of the ones prescribed at the end of the section:
$ export PATH=$PATH:$RISCV_LINUX_GCC/bin
$ make linux INSTALL_DIR=$RISCV_LINUX_GCC SYSROOT=$SYSROOT$RISCV_LINUX_GCC to the directory in which you want the new tools
to be installed. Then, add $RISCV_LINUX_GCC/bin to your
$PATH environment variable. Finally, invoke make,
specifying $RISCV_LINUX_GCC as the target installation
directory.Using Filesystem in Userspace (FUSE) to Create a Disk Image
mount to
mount the newly-created disk image for modification, and you also have
Filesystem in Userspace (FUSE), you can use these commands to modify your disk
image.-o +rw
option is considered experimental by FUSE developers, and may
corrupt your disk image. If you experience strange behaviors in your disk image,
you might want to delete your image and make a new one. Continuing, mount the
disk:umount:Building BusyBox as a Dynamically-Linked Executable
libc.so.6, the C libraryld.so.1, the run-time dynamic linkerlibm), you will need to include those as well.riscv-linux-gcc and were placed in $SYSROOT. So, mount
your root disk (if not mounted already), cd into it, and copy the libraries into
lib:
$ cp $SYSROOT/lib/ld.so.1 lib/CONFIG_STATIC box in the menuconfig interface.
CONFIG_STATIC=n, listed as "Build
BusyBox as a static binary (no shared libs)" in BusyBox Settings
→ Build Optionssed magic instead.
$ sed -i 's/CONFIG_STATIC=y/# CONFIG_STATIC is not set/' .configmnt/bin.
$ cd $TOP/linux-3.4.53/mnt
$ cp $TOP/busybox-1.21.1/busybox bin
Appendices
Building the Native Compiler (3.19 SBU)
riscv-gcc repository. If you desire, read on to build the native
compiler...
$ dd if=/dev/zero of=root-gcc.img bs=1M count=256
$ mkfs.ext2 -F root-gcc.img
$ mkdir mnt-gcc
$ sudo mount -o loop root-gcc.img mnt-gcc
$ cd mnt-gcc
$ mkdir -p mkdir -p bin etc dev lib proc sbin tmp usr usr/bin usr/lib usr/sbin
$ curl http://www.ocf.berkeley.edu/~qmn/linux/linux-inittab > etc/inittab
echo to a file, now is the time to rebuild BusyBox with
vi. These instructions will assume you've got the original BusyBox
binary. Either way, copy it into bin, and set up the
init symlink.
$ ln -s ../bin/busybox sbin/initriscv-gcc repository, clean up the other things, and then
check out the "native" branch.
$ make clean
$ git checkout nativeSSIZE_MAX is defined. I really didn't want to do this, but it
will suffice for now.native-patches/
also contains augmented configuration files for the MPC, GMP, and MPFR libraries
so that it will recognize riscv as a machine. Someday, we hope that
we won't have to patch it.make with this command:
$ make native SYSROOT=$SYSROOT$SYSROOT, because
this compiler only runs within Linux/RISC-V. Therefore, we should place it along
with our other files in $SYSROOT.$SYSROOT/usr/bin. It would be easy enough to copy out
gcc, but there are a bunch of other files that are needed for it to
run properly. We'll copy those now.
$ cp $SYSROOT/usr/bin/gcc usr/bin
$ cp $SYSROOT/usr/bin/{as,ld,readelf} usr/bin
$ cp $SYSROOT/usr/lib/crt{1,i,n}.o usr/lib
$ cp $SYSROOT/usr/lib/libc.a usr/lib
$ mkdir usr/libexec
$ cp -r $SYSROOT/usr/libexec/gcc usr/libexec
$ cp -r $SYSROOT/usr/lib/gcc usr/lib
$ cp $SYSROOT/lib/ld.so.1 lib
$ cp $SYSROOT/lib/libc.so.6 lib
$ cp $SYSROOT/lib/libdl.so.2 lib
$ cp $SYSROOT/usr/lib/libgcc_s.so* lib
$ cp -r $SYSROOT/usr/include usr/
$ sudo umount mnt-gcc
$ spike +disk=root-gcc.img vmlinuxecho, hopefully built-in to your
ash applet, to write out a short "Hello world!" program:gcc.
Hello world!gcc working
on your system! If
you get this far, think about it. You've used an x86 GCC compiler to compile
riscv-linux-gcc, an x86 to RISC-V cross-compiler. Then, you used
riscv-linux-gcc to compile the native version of GCC,
which runs on Linux/RISC-V to compile RISC-V binaries. If your head isn't
spinning from all that meta, you may consider reading Hofstadter.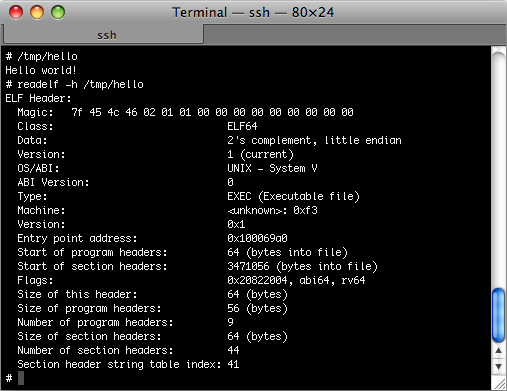
"Hello world!" compiled and run on Linux/RISC-V and readelf output.
References