Protosnap | LilyPad Development Board
Lilypad provides a quick start guide on their website. It is important to note that you should not break apart your protosnap until you understand the different functions.
Using the hardware:
- There are 14 digital pins. They default as inputs (high impedance state).
- Input pins make extremely small demands on the circuit that they are sampling equivalent to a series resistor of 100 megohms in front of the pin.
- There are 6-8 analog pins.
- These can be configured to function as digital pins.
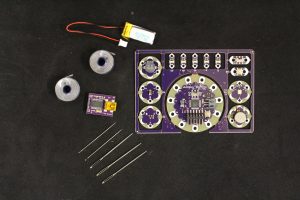
- The pin number of each component is printed on white silkscreen on the inside board. Below is a table of each pin number paired with its component.
| Component | Arduino Pin |
| Motor | 3 |
| RGB LED – Red | 9 |
| RGB LED – Blue | 10 |
| RGB LED – Green | 11 |
| Button | A5 |
| Slide Switch | 2 |
| White LED’s | 5, 6, A2, A3, A4 |
| Buzzer (+) | 7 |
| Buzzer (-) | 12 |
| Light Sensor | A6 |
| Temp Sensor | A1 |
Details on the more complex pieces of the development board:
- ATmega328 (big black square in the middle board)
- The microprocessor; the “brains of the operation”
- Function: stores and executes Arduino sketch.
- LED (to the right of the ATmega328)
- Used for blinking
- Reset (Top left)
- Momentary push button
- Resets ATmega328
- On/Off slide switch (Under ATmega328)
- The board will do nothing if it is not connected to a power source (i.e. USB).
- White connector
- Common power connector
Installing Arduino
You will need to download Arduino to operate this board.
Installing the FTDI Drivers
The FTDI Basic Breakout board programs the Lilypad Arduino Simple. It is also able to power the development board or charge the Lilypad battery. However, you have to first download some drivers. Download the VCP Drivers that match your operating system and follow along with the Installation Guide.
If you have any trouble installing the drivers, email the Sparkfun tech support team.
Upload Blinking
Follow the Getting Started tutorial on the Sparkfun page to code the LED lights to blink.
Other tutorials
Many other tutorials can be found on the Sparkfun tutorial page.
- Getting Started tutorial: A guide to where the battery is, the LEDs and the on/off switch.
- Getting Started tutorial 2: A guide to show how to snap apart the board and how to sew in the conductive thread.